Friday, September 16, 2005

MODIFIED MATILDA PLUS SAILING TO WINDWARD


......................Image- Courtesy of Les Leonhardt........................


????What Constitutes A Modified Matilda???[Status as of Sept. 30/04]
OR
Things I have learned about a MATILDA 20


Efficiency
....Cosmetic
........SafetyX........ #1. Install inboard jib sheet fairlead track [13 degrees rather than 25 degrees] and install Harken cam cleats
X........ #2. Install 12" Leader on jib tack
X........ #3. Fair and apply 2 part paint to centerboard and bulb plus rudder [Awlgrip Forest
Green]
........ X#4. Revise centerboard raising/lowering pulleys to reduce wear on front centerboard guide as well as ensure safety bolt engagement
........X #5. Install safety limit strap on centerboard
....X X #6. Replace wooden handrails with stainless handrails
X X X #7. Install 15" windex wind indicator on proper mount
X.... X #8. Tension standing rigging to ensure a taut rig
....................................... 5/32" 1x19 wire-B.S. =3300lbs
..................Forestay 15% of breaking strength = 500lbs
.........Upper shroud 15%. "......... ".............. " .....= 500lbs
.........Lower shroud 10%. " .........".............. " .....= 330lbs
....................Backstay 5% ."......... ".............. " .....= 165lbs
X. ....X #9. Make new bushings for rudder pintles and gudgeons
X...... #10. Install spring on rudder to ensure leading edge of rudder blade is at 90 degrees to
waterline
...X.... #11. Replace window gaskets
...X.... #12. Replace windows with lexan
...X.... #13. Paint hull from waterline to gunnels with 2 part paint [Awlgrip Forest Green]
...X. ...#14. Install name on hull
X...... .#15. Move gas tank to starboard cockpit locker
........X#16. Make bracket to install life ring on stern pulpit
...X.... #17. Paint cabin entrance trim and door
X....... #18. Replace loose slugs on mainsail
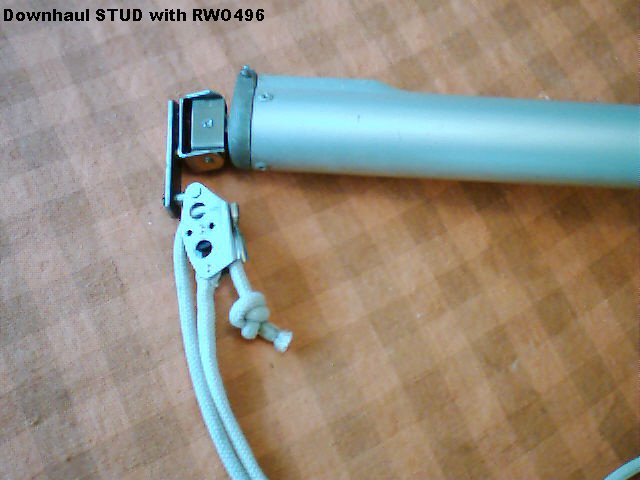
X....... #19. Make boom downhaul functional
X....... #20. Replace genoa track so that genoa track fairleads function
X X X #21. Make caps for ends of spreaders so that they do not droop
...X.... #22. Fill nicks and gouges in gunnel with gelcoat
...X.... #23. Remove winch, organizer and eye straps from cabin top
...X.... #24. Fill bolt holes with epoxy
...X. X#25. Replace rotted wood on motor mount with plastic
........X#26. Replace wiring and bulbs on mast
...X.... #27. Replace broken screws in hatch cover slides
X X.. .#28. Make a Mobius Brummel splice to attach jib clew shackle to jib sheet
....X ...#29. Replace tiller with custom tiller from Nordica
........X#30. Make new motor lock so that motor mount functions properly

SAILING TO WINDWARD
Sailing to windward is an art and to a large degree is what sailing is all about. The shape of sailboats is even dictated by this observation. The most popular type of sail plan is the Bermudian-rigged sloops because they are so efficient to windward.
Sailing with the wind behind you, most boats tend to be relatively similar in performance. The exception is that if you have managed to present more sail area to the wind, e.g. spinnaker, whisker pole etc., you will gain marginally on your opponent. When sailing down wind, sail area is the most critical component. EVEN A HAYSTACK CAN SAIL DOWNWIND.
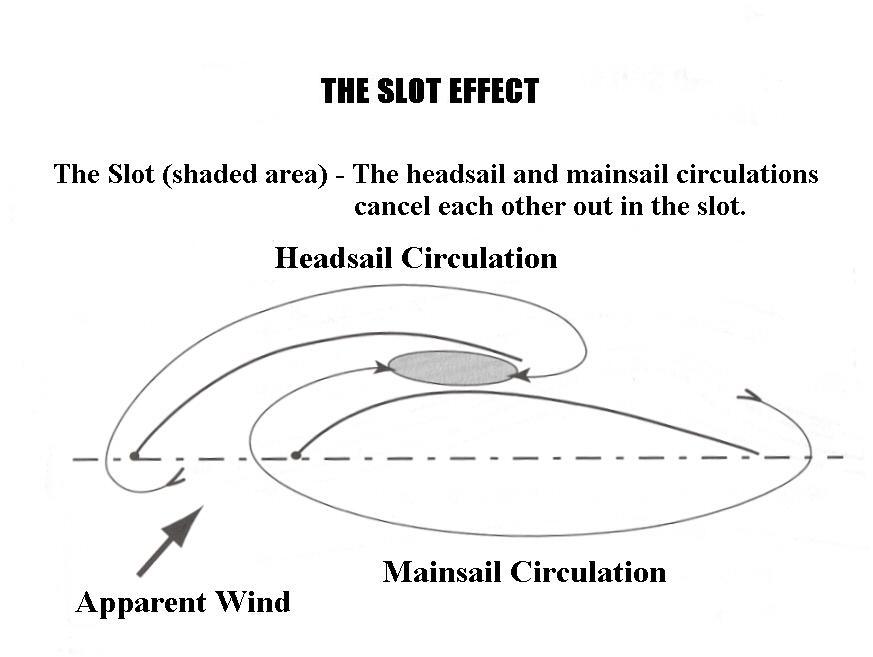
But when sailing to windward, sail shape and the sails’ relationship to one another are much more critical and demanding, but ,OH, so rewarding. When sails are properly set and performing well, there is a tremendous improvement in speed and pointing ability over an improperly rigged set of sails. The sum of two sails, properly trimmed, to the wind strength can be more than the total of each individual sail. In other words, if the mainsail provides 100 lbs. of forward thrust by itself and the jib provides 50 lbs. of forward thrust by itself, when they are rigged and trimmed to properly complement each other, you might end up with 200 lbs. of forward thrust. THIS IS THE "HOLY GRAIL" OF SAILING.
Many different styles of sailboat, e.g. sailboards, catamarans, are faster on a beam and broad reach than sloop rigged mono-hulls, but if they are asked to compete around a race course, the sailboards and catamarans are at a great disadvantage because of their lack of ability to point well.
So where does a Matilda fall in the grand scheme of things? Because of its broad beamy hull, a Matilda’s strength is its great stability. On lesser boats, if you step on the gunnel, the boat is likely to tip over, but on a Matilda, she says, "Welcome aboard and sit yourself down, if you please".This tremendous stability is what endears many Matilda owners to their pride and joy. This fact also carries over to the crew who think that nothing can go wrong when sailing a Matilda because they are so stable.. This stability is also a great asset when it comes to beam reaching and broad reaching, especially with a big genoa . It is really exhilerating to be on a Matilda with sails properly set, on a close reach, and when the centreboard is pulled up, tear off onto a screaming plane. (Try that, you keel boats.)

A case in point is, at the 
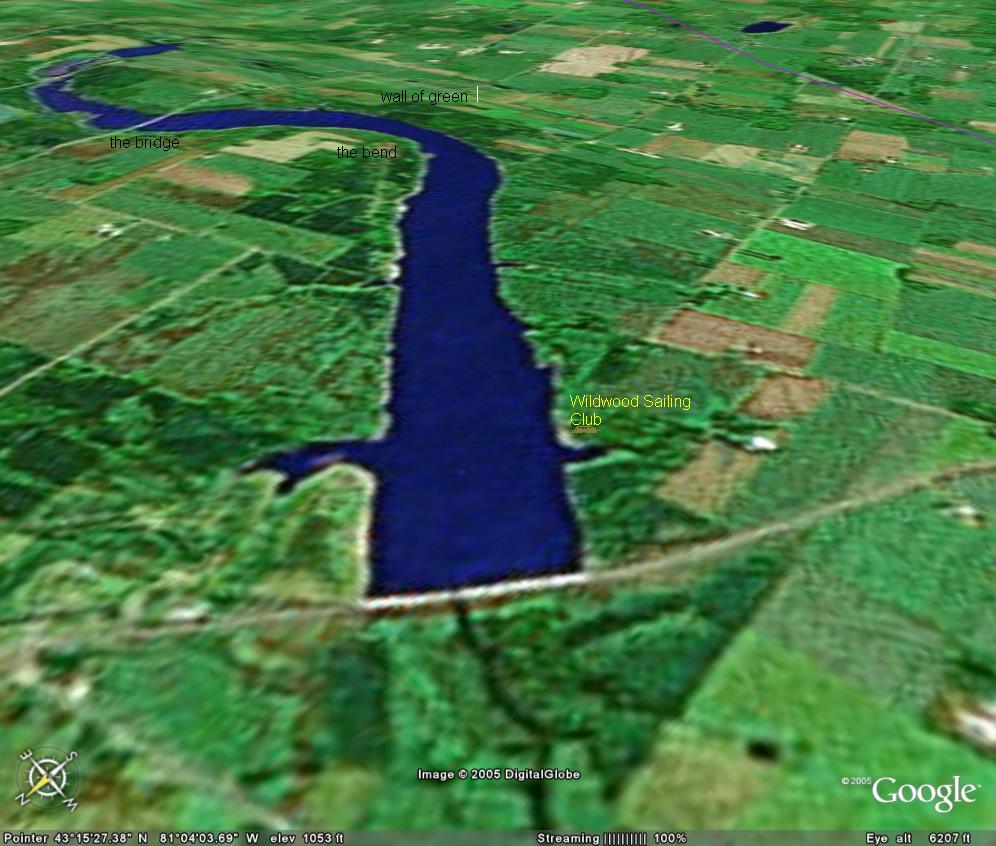
Wildwood Sailing Club, when we have the wind out of the northwest, [the prevailing wind direction, in our area] running down the lake is a piece of cake, and if you happen to "go around the bend", that is head off on an easterly beam reac
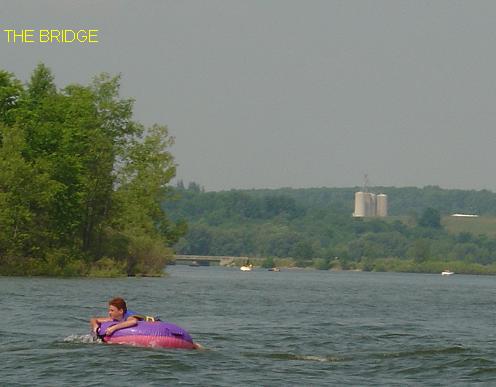
h, you can really enjoy a relaxing sail right down to the bridge at the end of the lake. But now the fun begins. When you turn around to head back to the club, the first section, on a beam reach, goes reasonably well until you hit" THE BEND". Because the wind, coming straight down the lake from the northwest, hits the "WALL OF GREEN" [ trees surrounding the lake shore], the wind bends around the corner producing a westerly shift to the wind at the bend. Sailing into this shift forces you to change from a beam reach to a close reach (pointing) and your progress around the bend is impeded. If your boat does not point well, you can spend a long time (it seems like forever) making progress around the bend and then, when you finally do get around the bend, you are faced with a beat to windward back to the club.
This lack of pointing ability reflects poorly on the owners of Matildas in general. Prior to acquiring our Matilda, we would leave the end of the lake at the same time as a Matilda, and be back at the club in one quarter of the time it took the Matilda to return to the club. This self congratulation was not entirely due to superior sailing skills but to the dramatic difference in the pointing ability of our two completely different crafts - the Matilda, broad beamed and poorly rigged for pointing and our KD (http://kerry-dancer.blogspot.ca/), a highly refined pointing machine.
Upon acquiring the Matilda, I pondered what could cause the tremendous difference in pointing ability between the two crafts. It finally dawned on me that the chord of the foresail on a Matilda was the main culprit, aside from the difference in the hulls. That was when I decided that something had to be done to improve the pointing ability of our Matilda, as I was not content to go from leading the pack to bringing up the rear. It also dawned on me that people who owned Matildas can be incorrectly looked down upon for their lack of sailing abilities when their boat is actually the problem. This "defect" in the boat causes many Matilda owners to forgo the pleasures of sailing to windward and to be content with beam and broad reaching, and if they do go around the bend, they decide that motoring back to the club is the "GENTLEMANLY" thing to do.
So once the problem has been defined, how do we go about correcting it?
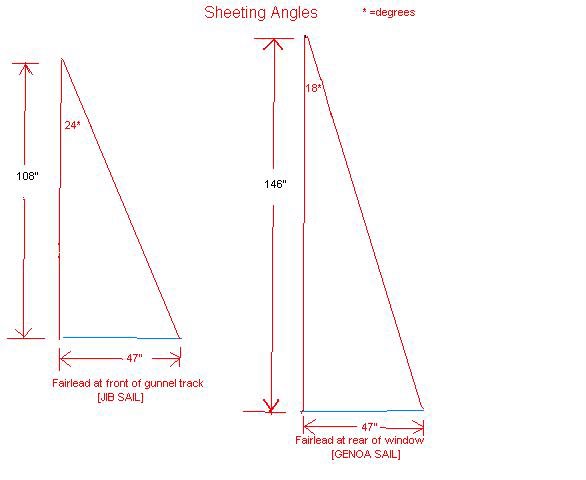
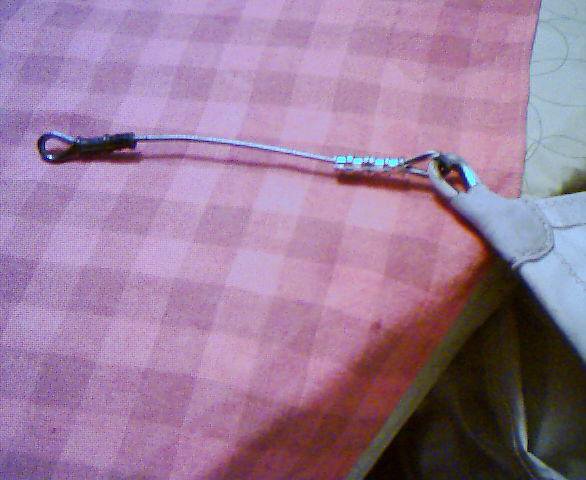
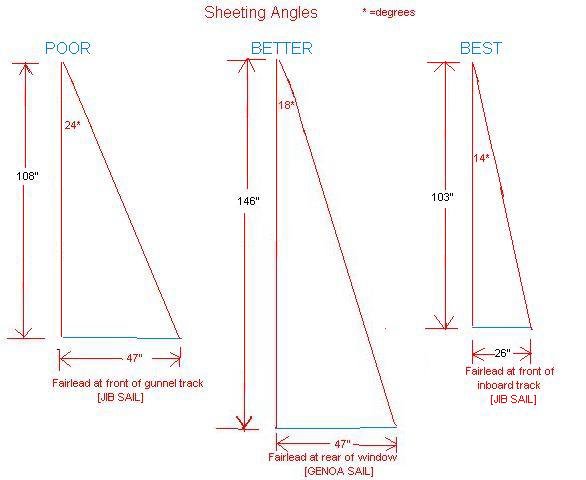
The original position of the jib sheet fairlead anchor, on the gunnel track results in a chord angle of 24degrees. Much too open to properly complement the main sail, when going to windward. [It is almost impossible to ever backwind the main sail with the jib fairlead in it's original position]. By moving the jib sheet fairleads to the cabin top, we could get close to the desired chord angle of 12degrees. It was also necessary to add a leader to the tack of the foresail [to raise the sail] so that the cabin top fairleads could be utilized. We also added cam cleats for the jib sheets, which make sheeting the jib a "piece of cake".
This installation has greatly improved the pointing ability of our MATILDA and has resulted in many a surprised look from skippers, we have brushed against, who have always thought that MATILDAS could not go to weather well.
All in all, a very worthwhile modification!!!

P.S. JIB TACK LEADER and INBOARD JIB SHEET FAIRLEAD TRACK postings also contain information concerning SAILING WELL TO WINDWARD.

Nowhere has it been mentioned how critical a good wind indicator is to achieving good windward performance. Others manage to sail well with wind indicators on their shrouds or a ribbon from the masthead and I compliment them on their ability to read the wind. However, a WINDEX 15, with the vanes set to the appropiate angles for a MATILDA (notice special bracket for mounting wind indicator), allows a helmsperson to notice and adjust for the slightest change in wind direction [THE WIND IS NEVER CONSTANT- THE ONLY THING CONSTANT ABOUT THE WIND IS THAT IT IS CONSTANTLY CHANGING]. A characteristic of the most proficient sailors is that they monitor the wind direction, frequently.

In my opinion, a sail boat that goes to windward well is a much more enjoyable craft to sail and results in a much safer, faster and more responsive vessel than the MATILDAS as they came from the builder.

Thursday, September 15, 2005

STAINLESS STEEL HANDRAILS PLUS COCKPIT DRAINS

STAINLESS STEEL HANDRAILS


Wooden handrails on a MATILDA are things of BEAUTY, but they do require a fair amount of maintenance to keep them looking PROPER. Another factor to consider is how structurally sound are they? After 30+ years of exposure to the elements, even with the best of care, the wood's strength [structure] may have deteriorated.
A case in point is that, the previous owner of our MATILDA was working on his boat, on the trailer, when he lost his footing and grabbed the handrail to break his fall. Unfortunately, the handrail followed him to the ground. Luckily, the only thing hurt was his pride.

When doing the restoration of our boat, locating proper handrails was a challenge. We could find wooden replacement handrails that were close but NOT exactly a PROPER fit. Then, we found out about STAINLESS STEEL OUTFITTERS, located in Barrie, who made the original bow and stern pulpits for the MATILDA. Their handrails were reasonably priced, compared to something close in wood, and fitted the existing mounting pads exactly. Installing them was quite simple and straightforward and we can rest assured that if we ever need to avail ourselves of them, they will serve the purpose they were designed for + THEY WILL NEVER NEED MAINTENANCE!!


COCKPIT DRAINS


One always assumes that the builder of a product has properly designed and built a product that will stand up to the test of time. This may not have been the case with our MATILDA.


For example, while checking over our Matilda prior to launching in the spring of 2008, I was amazed to see something (?) protruding from the starboard cockpit drain exit in our transom. It turned out to be a copper (?) 1" O.D. drain tube. It was protruding out approx 1/2".


Upon checking further, it was quite evident that the tube was very loose in the original placement but what shocked me even more was the fact that by working its way out, it was completly free of the rear of the cockpit wall. The fibreglass at the entry to the drain channel is only 3/16" thick.


Notice the gap at the bottom of the exit hole.


THIS SITUATION COULD BE QUITE CATASTROPHIC!


#1 In the event of a heavy rain (1"or more), all the rain collected in the cockpit could find its way to the bilge.

#2 In the event of significant wave action while the MATILDA is tied up at its dock, water splashing into the exit end of the drain tube could also end up in the bilge.

#3 In the event of a heavily loaded MATILDA ( with several passengers in the cockpit, an outboard motor on the transom and a full fuel tank) enjoying a spirited afternoon of sailing, if the drain tube happened to dislodge while sailing, water could easily enter the transom exit and also find its way to the bilge.


All of the above scenarios could result in the MATILDA slowly filling with water with no one being aware of the situation.


To enable further investigation, the drain tube was removed, after making up a .875" O.D. expandable collet.


Upon examination of the tube, it was evident from the stains on the tube that there must have been some type of adhesive (?) on the outside of the tube that over a period of time period of 30+ years had deteriorated to the point that the tube was no longer restrained in its original position.


As the inner end of the tube only terminated in fibreglass that was 3/16" thick, when the tube moved towards the rear 1/2" the inner end was no longer supported in the rear cockpit wall. The outer end was supported thru the transom wall + 3/8" board glassed to the inside of the transom wall.


The starboard tube , as shot with digital camera from port lazarette.


The port tube was removed quite easily as well.


One of the benefits of this experience was that I learned a digital camera can be a very useful tool. Rather than cut and install a inspection port in the rear cockpit wall, I was able to poke a digital camera into the lazarette, point the camera in the general direction of what I wanted to capture and was able to take a excellent quality image of the situation.


My solution to this problem was to make up longer stainless steel tubes that did not rely upon an adhesive to hold them in position but a mechanical fastening (stainless steel cotter pin) to ensure that they stayed in position. The tubes can only be inserted from the transom end as the built up cockpit floor prevents them from being inserted from the cockpit.


The stainless steel tubes, which were a few thousands of an inch larger than the copper tubes,were a snug fit in the drain tubes holes. I elected to have them protrude thru the transom by 1/2" so that any drain water from the cockpit would not run down the transom. Because of the increased size of the stainless tubes, I did not think it was necessary to use any adhesive as I know they cannot fall out. I will check the next time our MATILDA is out of the water for any seepage and I will certainly check the bilge for water each time we go sailing as our bige is normally dry.


So a note of caution to all MATIDA owners to check that their cockpit drain tubes are in their proper position before launching their boats.


MAST RAISING/LOWERING SYSTEM

The secret to having a SUCCESSFUL mast raising/lowering is to have control of the mast at ALL times.
One of the idiosyncrasies of raising/lowering a MATILDA mast is that the cabin hatch cover interferes with the mast if the mast is allowed to rest on the top of the rear pulpit, when the mast base is inserted in the mast step.
(If the mast has been removed from the boat, reattach lower shrouds to front chain plates, reattach upper shrouds to rear chainplates.)

Outlined below is our solution to this problem.
Install wind indicator, etc.
Check shrouds are free to move aft.
Install mast support over top bar of rear pulpit and tighten securely two wing nuts
Check halyards are free to move and properly installed.
If extra help is available, install a sturdy [preferably 1/2" yacht braid] line to the forestay so an individual can operate a safety line [he or she takes up the slack in the line when mast is raised and can also hold the mast in any position, in case a shroud or backstay gets snagged on something].
If boom vang/gooseneck downhaul is attached to aft pin hole in mast step, remove fittings.

LIFT MAST FROM TRANSPORT POSITION TO MAST SUPPORT
When mast is supported by the mast support and front pulpit transport position, it can easily be moved aft on the mast support by one person and the mast base can be installed in the mast step.


Brackets that attach to top of rear pulpit [keeps the support from moving up or fore and aft].


Feet on support are restrained from moving forward by the lip on rear of cockpit [tiller can still function with mast support in position- GREAT if you have to lower mast to go under a bridge, etc].


Roller wheel and guides which allow mast to be moved aft by one person.


MOVE MAST AFT AND INSTALL IN MAST STEP

Install bungee cords to hold turnbuckles upright.


Mast base in mast step.
Notice bungee cord holding shrouds upright [reduces chance of bending turnbuckles when raising mast]


Mast ready to be raised.
DOUBLE CHECK
Wind indicator installed.
Turnbuckles held in upright position.
Shrouds are free.
Backstay free to raise. [ my preference is to drape the lower portion of the backstay over the rear pulpit and the upper portion out behind the boat]


RAISE MAST
One person stands in cockpit and lifts mast as high as possible.
Another person straddles mast and stands on cabin roof, bracing mast from moving sideways.
The safety person takes up the slack in the safety line.
The mast is pulled forward as far as possible and the forestay attached.


Revised Mast Raising/Lowering System

Posted October 20, 2009.


The system described previously worked well but here is a suggestion for an excellent system for raising/lowering the mast on a MATILDA by one person, with a minimum of effort and completely under control.


This NEW and IMPROVED mast raising system is based on a fellow club member's mast raising system used on his MacGregor 26X.


It was always a source of amazement to me that this experienced and knowledgable sailor could raise and lower his mast, by himself, with no undue excitement or mishaps as compared to some instances when someone slips and falls or happens to turn a turnbuckle the wrong way. It's always nice to have help when raising or lowering a mast but sometimes help doesn't appear when you are ready to proceed and accidents can happen. Also, I am a great believer in approaching and solving a problem with the right tools and equipment- I abhor the spectacle of a dramatic mast raising e.g. raising-of-the-flag-at- IWO-JIMA-routine-it's great when successful but the chance of a mishap is always there.
As long as a mast is truly vertical, there is little chance of disaster but if the mast gets off to one side,you could be in real trouble as even the strongest deck ape could experience difficulty trying to bring it back to vertical.

Attaching a mast raising system might take a few moments more but you can be confident of the result.


Also, this approach is very well suited to any craft that has a furler installed.


The components of the mast raising system


#1 Brake winch - Dutton-Lainson #DLB350A or equivalent is ABSOLUTELY essential to control the mast raising effort with ease and confidence.


#2 Pole with tangs to attach to mast step. It is necessary to drill a 3/8" diameter hole in the mast step to accept the pole tangs.


#3 Bail for attachment to mast. It is necessary to drill a 1/4" hole in mast 6 feet up from the bottom of mast to accept the thru bolt for the bail and side stay tangs


#4 Top quality rope. The rope to hold the gin pole in position should be marked to indicate the correct angle of the pole and tied securely to the foredeck cleat. also make sure the cleat is securely anchored for an upward pull.


#5 Eye straps for attaching ropes to pole and pulley for rope to bail.


#6 Tangs and wire rope for side stays for mast.


#7 Attachment brackets for lower end of side stays.
Absolutely essential that the pivot points of the side stays be on the same pivot point as the mast step bolt.


The brackets attach easily to our stainless steel handrails with two 1/4"-20 bolts. The brackets ride on ultra high density polyethylene runners above and below the handrail to ensure the stainless handrail does not get scratched. The bracket is prevented from moving aft by the UHDPE hitting the attachment post.


Starboard anchor bracket.


The complete mast raising system (with the exception of the side stay anchors and the upper tangs) can be purchased from a local MacGregor dealer for around $200.00. You will have to devise an side stay anchor system that is compatible with your boat.


Mast raising system installed and everything is ready to go.


The mast is halfway up and everything is under control. You can lower it if necessary or even walk away and leave it for a moment.


The mast successfully raised by one person with no excitement or drama. The bend in the mast is quite evident
which ensures that the forestay can be easily attached.


Raising a MATILDA mast should be effortless with the proper planning and equipment. It should not be the situation where you are going to raise your mast and everyone runs the other way.


P.S. May I suggest having a look at previous posting if you have not already done so.

MAST RAISING/LOWERING SYSTEM contained a lot of useful tips regarding mast support, bungee cord on shrouds, reminder about wind indicator installation, etc..

Wednesday, September 14, 2005

JIB TACK LEADER PLUS DECKSWEEPER PLUS TRAVELLER

" THE CHORD IS THE KEY "

Definition: [SAIL POWER-page 54]- The chord is a straight line drawn horizontally from the luff to the leech at any height in the sail

Having the proper foresail sheet fairlead location, ensuring proper leach and foot tension, is essential to the foresail [jib or genoa] performing well on a MATILDA. Many MATILDAS use the gunnel track fairlead block for trimming their jib foresail as well as their genoa foresail. Both sails require the proper fairlead location to perform well. The gunnel track is ideal for beam and broad reaches with a genoa foresail, however when going to windward with the jib foresail, the outside track is less than ideal. Many other boats use a similar gunnel track [because it is convenient] but not many other boats have the broad beam to length ratio of a MATILDA.

Athwartship Location[sheeting angle]
The biggest area of concern is the angle of the foresail fairlead block location. Using the outside track, with the block right at the front of the track, gives you a sheeting angle of 24degrees, when you should have an angle of 10-12degrees to allow the jib and mainsail to complement each other [as well to properly tension the foot and the leach of the jib]. Moving the fairlead aft, as when using a genoa foresail, the angle decreases to less than 24degrees [under the rear corner of the window gives a sheeting angle of approx. 18degrees] which is acceptable for beam and broad reaches. This observation explains why MATILDA owners, who install a genoa foresail and head out in medium strength winds, find their craft performs reasonably well, but then the breeze freshens and they decide to switch to the jib foresail [because of the reduced sail area] and then find out they can not perform to windward as well with the smaller sail.

Fore and Aft Location
For a starting point for the fore and aft location of the fairlead, [for a jib with the following dimensions foot=104", luff=264", leach=244"] it should be on the extension of a line drawn from a point 60% up the luff through the clew [ this position has to be adjusted depending on wind strength].

Sailing by the luff is a time honoured method of sailing to windward but keeping the jib sail just on the verge of luffing is very demanding of the helmsperson. It is easy to see when you are sailing too close to the wind [the sail shakes at the leading edge and you need to fall off the wind a bit] but it is difficult to determine when you are sailing too far off the wind. A good masthead wind indicator helps [mine keeps telling me to head up when sail is not on the verge of luffing] and telltales on the front part of the sail-back about 8" from the leading edge and placed at 1/4, 1/2, and 3/4 up the leading edge-help to tell you how to improve the trim of your sail.

The leader is made up of 1/8" 1X19 stainless wire with a thimble nicropressed on each end[two sleeves used on each end because of the slow spiral of 1X19 wire] to give an overall length of 10" [14" would have been a better length] in an effort to raise the sail to give an improved fore&aft location because the front end of the tracks terminate at the chainplates.

If you can not move the fairlead forward, RAISE THE SAIL. Raising the sail allows you to achieve a tight leach, without tensioning the foot too much, which reduces the power of the sail.

Installing a leader on the jib sail of a MATILDA will help to improve the windward ability by a limited amount and will eliminate the spectacle of a jib sail with a very open leech.

However, the biggest improvement in a MATILDA's pointing ability will be achieved with the installation of inboard jib sheet fairlead tracks. [See INBOARD JIB SHEET FAIRLEAD TRACKS]

P.S. It is essential to have a leader if you are going to install inboard jib sheet fairlead tracks.


DECKSWEEPER JIB

Several people have commented that having a leader on the tack of the foresail raises the foot of the foresail which loses the decksweeper effect of the foresail.


As you can see in the above photo, the MATILDA on the right with a raised jib, appears to have a larger bow wave [going faster??] than the one on the left, with a decksweeper genoa. Both are using the gunnel track for fairlead location. A craft with a flush foredeck is a different story but a MATILDA with the front of the cabin in the airstream [which probably has a negative effect] will not benefit greatly. In my opinion, it is more important to direct the power of the wind to where it can be utilized e.g. the leeward side of the main, than it is to capture all the wind and direct it over an area where it will have no effect e.g. the area below the main sail.
In my opinion, the ability to have a tight leach on the jib, that parallels the main sail rather than an open leach, is more critical than a decksweeping foresail.


The Slot effect from MAXIMUM SAIL POWER
by Brian Hancock
Chapter 15 page 241 Circulation Theory
[An excellent treatise on the latest thoughts on the slot effect]
In order for two sails to have a symbiotic relationship, they have to be in relatively close proximity to one another [24degrees is too far apart for the sails to impact one another]
P.S. It is interesting to note that the chord of the foresail in the illustration is approximately 14degrees.


TRAVELLER

A traveller is a very useful tool for controlling the main sail in relation to the centerline of the boat as well as influencing the shape [power] of the sail.

Advantages
#1. Moving the traveller to leeward, when encountering strong winds, can have an amazing effect on the heeling of a tender craft[See the next 2 photos and accompaning tale]
#2. Moving the traveller to windward, in light airs, allows you to move the boom to the centerline of the boat [which allows you to point higher] without flattening [depowering] the main sail.
#3. Changing to mid-boom sheeting, with a traveller allows you to change from an unsatisfactory main sheet system which is not suitable for windward work.


It is worth mentioning, at this point, that Roger Macgregor, the boat building minimalist, has added a traveller to his latest effort, the NEW 26M. Roger, you can be sure would only add something if it would benefit the boat.


ADVANTAGE #1

They say that a picture is worth a 1,000 words so I will let the next two pictures speak for themselves . Photos from SAIL POWER by Wallace Ross page 132


Main sheet in centre position
[NO EFFECT OF TRAVELLER]


Main sheet to leeward
[TRAVELLER AFFECTING MAIN SAIL]


These two pictures show how differences in trim affect a boat's ability to stand up and to point. DAME PATTIE has her mainsheet trimmed much too close to the centerline and as a result is heeling way over, while INTREPID is trimmed correctly, thus keeping on her feet and making good headway.

After viewing the above photos, I elected to add a traveller to our K-D, with mid-boom sheeting with advantage #1 in mind.
An enlightening tale follows.
On a blustery day at the Wildwood Sailing Club, we noticed a CL16 running down the lake and decided to see if we could catch him. We did manage to pull alongside him, at the end of the lake and we both proceeded to come about for the beat back up the lake. After our first tack, I knew we were in for a challenge because of the strong winds. On our second tack, I moved the traveller to leeward about 8" and an amazing change occurred. We were no longer sailing in survival mode [ using all our talents to keep the boat from capsizing] but were making excellent progress to windward, without the potentially dangerous heeling that we were encountering without the traveller. We proceeded to make further excellent progress to windward but our sailing friend [ a very skilled sailor] continued to proceed back and forth across the lake but was not making much progress up the lake [he was just trying his best to keep his craft afloat].
Halfway back to the club, another skilled and knowledgeable sailor, with his wooden sloop that he fancies is quite a racer, elected to change his course and join us in the beat back to the club. After his first tack, he knew that he was in for a challenge but managed to keep going to windward in extreme conditions. He also was not making much progress to windward but was flying from one side of the lake to the other. We proceeded to the club under relatively pleasant conditions as the other two boats continued to thrash back and forth across the lake.
I WAS REALLY AMAZED AND IMPRESSED. Just 8" to leeward made all the difference between a sail in challenging conditions to a sail in less demanding circumstances. I know it is very satisfying to survive a sail under demanding conditions [Yes, I too, have kissed the "terra firma" after surviving a interesting sail] but it is comforting to know that going to windward doesn't have to be so punishing if your craft is properly equipped for such conditions.What is really amazing is that we made so much progress to windward and were far, far more comfortable.
Prior to installing the traveller, our technique for sailing to windward in strong winds, was to sheet the jib as tightly as possible [the jib alone should never have enough power to capsize you] and luff the main when capsizing seemed imminent and NEVER, I repeat, NEVER cleat the mainsheet.This technique has served us well in the past, until the wind gets so powerful that it gets under the hull [because you are on such an angle of heel] and you find that easing the main has no effect and then, you go swimming with your boat.
When you are sailing to windward, you are tempted to pull the main sheet as tight as possible [pulling the boom to the centerline] so that you can point as high as possible. You also want the boom as low as possible to flatten the sail [flat sail reduces power in strong winds]. This is a recipe for trouble as it results in excessive heeling. Having a traveller allows you to pull the boom down [flattening the sail], without pulling the boom to the centerline.
Another aspect that became clear was that a rope and pulley system for adjusting the traveller car was not really necessary, as adjustable stops, set by just retracting a pin, was more than adequate for beating to windward with a traveller.

So, to all the tender boat owners out there, adding a traveller to your craft, will allow you to cope when the wind strength increases.

I question whether a traveller is really necessary on a MATILDA as the craft is so inherently stable and will stand up well to increased wind much better than a more tender craft. In fact, our MATILDA seldom ever reaches the angle of heel that our K-D sailed consistently well at [like it was on rails] with the one side under water and the water coming in at the front of the seat and exiting at the rear of the seat.This opinion may change after I have converted our MATILDA to mid-boom sheeting. It may be found that a mid- boom sheeting system allows you to pull the boom much closer to the centerline than the existing CROSBY rig does, which may dictate the necessity of a traveller.


ADVANTAGE #2
Moving the traveller car to windward, in light air, should allow a boat to point higher by pulling the boom to the centerline without exerting significant downward pressure on the boom, [ flattening the sails]. In light air, you want the sail shape to be full and powerful.

ADVANTAGE #3
The original main sheet configuration [CROSBY RIG] of a MATILDA leaves a lot to be desired for Sailing to Windward.
A. When you are on a starboard tack, the main sheet comes across the cockpit and you can easily control the main sheet [cleat, release, adjust in or out].
B. When you are on a port tack, the main sheet is behind you and you must some how manage to cleat and uncleat the main sheet. Certainly not an ideal situation if you are in gusty winds where you must be prepared to uncleat the main sheet immediately when a gust hits and tighten the main sheet when there is a lull.
C. The CROSBY RIG configuration does not pull the boom to the centerline adequately. Once you are at point A on the travel of the boom, you are close to the limit of how close to the centerline you can move the boom with the mainsheet.
D. End of boom sheeting is less preferable to mid-boom sheeting because when you are attached to the end of the boom, pulling down on the end does not exert any effort [ other than the structural strength of the boom] on the mid point of the boom, where the sail [ because of the wind's pressure] is trying to pull the boom up. A mid-boom sheeting system puts the downward pull of the main sheet directly under the sails upward pull.
E. Use of a traveller at the end of the boom has to have twice as much range of movement to be as effective as a mid-boom attachment point, e.g. 8" of mid-boom movement dictates 16" of movement at the end of the boom.
F. Use of a traveller [which some people call a horse] between the stanchions of the rear pulpit has a limited range of movement- 13" range of movement divided by 2 = an offset of 6 1/2", at end of boom, equals 3 1/4" on a mid-boom arrangement. But the biggest problem is the tremendous aft pull of the mainsheet. There is a MATILDA at the W.S.C., with the horse [traveller between the stanchions ] as original equipment and he has had the boom detach from the gooseneck because of the aft pull of the mainsheet [ the nut holding the spring mechanism for the rolling boom furler became undone]. Definitely not something you need to happen in strong winds. So if you have the HORSE set up, be sure to use loc-tite on that nut.
G. Using end of boom sheeting [whether CROSBY RIG or HORSE ] tends to make the helmsperson sit towards the rear of the cockpit seat. A mid-boom sheeting system tends to move the helmsperson to the middle of the seat [ a definite plus as the last thing a MATILDA needs for proper boat trim is to have more weight in the stern of the boat].


Revised Traveller System

Posted October 7, 2009


Outlined below is a very simple and inexpensive alternative to a conventional traveller system.


The basic idea for an inexpensive traveller system for our MATILDA grew from this photo on the SIREN OWNER'S Website. The idea was originated (I believe) by Pat Regan.


This seems like a good opportunity to mention another great suggestion for individuals who like to make modifications to their boats at a reasonable cost. What follows is based on my experiences with E-BAY purchases.

In my misspent youth, I was a member of the Stratford Auto Club. One of my fondest memories of that time is spending many a Saturday morning touring the automobile wrecking yards (e.g Chants in London) looking for parts to replace damaged car parts from mishaps on rallies, driving skill tests, gymkhanas, ice racing, driving around Mosport etc. Since becoming involved in sailing, I have always regretted the fact that there are no boat wrecking yards, only marine chandlery stores selling high priced new parts for sailboats.
However, I believe I have found a good solution in the cyber store of e-bay sailboat equipment and gear.
My first experience has proven very successful. We have had a problem with the main sheet swivel cam cleat support arm bending from engaging the main sheet in the cam cleat (this arm was not designed to take the pressures associated with the main sheet demands of a Matilda), with the result that sometimes when we thought the main sheet was securely cleated, it would release under pressure from high winds on the main sail, and then it was a frantic grab to recleat it properly. I have bent the arm back to its proper position on several occasions but it always bent again.
I have checked for replacement cam cleat swivels
Ronstan RF8 at a cost of $ 260.00 CDN + GST + PST
Harken #144 at a cost of $120.00 CDN + GST + PST
I spotted a Harken #144 (item #140042223965) on e-bay (although the ad did not specify this) for the unbelievable starting bid on $19.99, and it also included an excellent Harken block ( itself worth about $25.00 US). The bidding eventually worked its way up to $36.00 US where I was the top bidder. With the addition of $8.95 US for shipping, the total cost was $36.00 + $8.95 =$44.95 US + 13% exchange = $50.79 CDN.(plus no G.S.T.&P.S.T.) The item was shipped from New Jersey on October 23/06 and was delivered to our door on Nov 1/06.
The end result was that a superb solution to our problem was accomplished for less than half the price of a new part, and I received a Harken block as a bonus.
It is my belief that many good quality stainless and aluminum parts for sailboats do not deteriorate to any great extent over the years, and when a boat is wrecked, parts can live on.

I am sure that many other Wildwood Sailing Club members have had similar favourable e-bay experiences.


So, with the above experience in mind, we embarked on a quest to install a functional traveller on "WALTZING MATILDA" at a reasonable cost.


The Schaefer stainless fiddle block, universal head, adjustable cam #505-76 was an E-BAY purchase (list price West Marine-2008 cat. $175.00+freight=$12.00+ 10% exchange=$18.70+5%G.S.T.=$10.29+8%P.S.T.=$16.46 =$232.45) purchased on E-BAY for (52.00+freight=$11.86 =$63.86)


One objective was not to install a conventional traveller car and track with mid boom sheeting on the step into the cabin as that might interfere with access to the cabin and might get stepped on.


View of port anchor for mainsheet traveller.


View of starboard anchor for mainsheet traveller.

(Since this photo was taken, this anchor has been replaced with a Harken #144 identical to port side and also purchased on E-BAY).
Both anchors have substanial 1/4" aluminum backing plates installed.


This main sheet system has performed well for the last season (2009) and allows us to offset the mainsheet anchor to leeward, to flatten the main in strong winds and to offset the mainsheet anchor to windward, in light winds to maintain a full powerful sail. In normal sailing conditions, the mainsheet anchor system remains in the middle and falls ready to hand as compared to trying to reach behind you to uncleat or tighten the main sheet when on a starboard tack.
Another item that has proven to be very satisfactory are the Harken #150 cam cleats as they release and cleat without any great effort and do not abrade the sheets as much as the other cam cleats did.


A track with adjustable stops might be an improvement but this alternative does work well and just requires a little extra work to adjust the main sheet anchor position.


This is another approach to installing a traveller on a MATILDA.
A stainless tube was attached to the rear pulpit support tubes and a traveller track was bolted to the tube.
The stainless set screws were replaced with 1/4"- 28 T.P.I. bolts that extended thru the fitting to trap the back of the tube.


GOOSENECK DOWNHAUL AND BOOM VANG ANCHOR

Light winds=low tension/ Strong winds=high tension

Having a tight mainsail luff in strong winds, is essential to a MATILDA or any other sailboat performing well.
The secret to having a tight luff is to not only have the mainsail halyard pulled as tight as possible, with the sail pulled as high as practical, but to have a system to pull the gooseneck fitting down as well, and to hold it down securely. I am always amazed that even though the main halyard is pulled as tight as feasible, it is always possible to pull the gooseneck fitting down 6-8", which assures that you have a tight luff for strong winds. It is even more critical to have a gooseneck downhaul if your mainsail does not have slugs in the sail track, which allow the sail to slide more freely in the groove.

If the luff is not tensioned properly (low tension in light winds/high tension in strong winds), you will observe the following results.


#1 If the luff tension is too high in light winds, your sail will be very flat and not have much "belly" (draught) and consequently you will have not as much power as you could have to propel your craft and you will probably have a vertical crease right behind the mast.
#2 If the luff tension is too low in stronger winds, you will notice deep creases up the luff of the sail and as well you will have a sail with a very deep "belly" (draught) which will be drawn aft as the wind strengh increases. This powerful sail will cause you to heel more than a flatter sail would and as well, having the draught further aft will cause the boat to round up more readily than with a flatter sail.
#3 The same principles that apply to the luff of a sail also apply to the foot of a sail. Proper tension on the OUTHAUL will also affect the shape of the sail (light winds=low tension/strong winds=high tension).


A gooseneck downhaul, in my opinion, is much preferable to a CUNNINGHAM system for tensioning the luff of a sail.
P.S.One needs to devise a system of supporting the boom, when installing the sail cover so that the lowest slug does not take all the weight of the boom.

The following is an excerpt from "UNDERSTANDING RIGS AND RIGGING" by Richard Henderson, concerning downhauls.
The lines that pull down on a sail are important because they apply tension to the luff, thereby affecting the sail's smoothness and, more importantly, its draft or camber. Considerable tension on the luff tends to flatten the sail and move the draft forward, a great benefit when beating in fresh winds. A slack luff increases draft and moves it aft, such a shape being beneficial in light breezes and for reaching or running in almost any strength of wind.
I prefer that the forward end of the boom be attached to a mast track (at least a short one) with the downhaul pulling the boom, rather than just the sail, down. However, many racers have their booms fixed in the vertical direction to optimize their handicap ratings. With a mast track, the luff length is measured to the bottom of the track unless a black band is put around the mast at a point beyond which the foot of the mast cannot be lowered. When the vertical movement of the boom is fixed, a cunningham downhaul is used. This consists of a line passing through a grommet several feet up from the tack of the sail, the line being used to haul the grommet down, thereby tightening the luff. A minor problem with the cunningham alone is that it will form a prominent crease in the sail's foot. This does little harm, but the sail would set better and perhaps be a trifle faster without the distortion.


HALYARDS


Reasons for a Tight Luff (from page 11, Aug. 2007- Practical Sailor)

Regardless of sail type or deck gear, one factor always affects the choice of line for any halyard, and that is stretch. When the goal is to get the best performance out of a sail, its halyard should stretch as little as possible when it comes under additional load from a freshening breeze or sailing closer to the wind. When a halyard stretches, it allows the sail fabric to move aft. The draft of the sail moves with it. This results in the driving force rotating aft, creating more heeling moment and more weather helm. The boat is sailing less efficiently than it could, and you may be forced to reef earlier than you otherwise would..
As its fabric pulls aft, a sail on a mast track will scallop between the slides, and horizontal wrinkles will form at the slides. Apart from looking unseamanlike and making life less pleasant aboard, this also puts uneven stress on the sail fabric, which could—depending on how much sailing you do under these conditions—shorten its useful life
By the same token, if you have an aging sail that’s rather stretchy along the luff, you could eke another season or two out of it while you save up for a new one by spending a couple of hundred dollars on a less stretchy halyard. The halyard you bought will still be good for the new sail a few years down the road.
Creep is a fiber’s taffy-like gradual elongation over time while under a static tensile load, and given how most sailors today are relying on at least one permanently hoisted sail, this factor will likely come into play.


Matilda's are most fortunate to have wire halyards with almost zero stretch (0.1%).

Other boats are not so fortunate in that they have an all rope halyard as original equipment and many of these boats have been converted to having the ability to control the main and jib halyards from the cockpit. As a result many of these boat's owners have resorted to extreme measures to ensure a tight luff but the simplest of these is the adjustable gooseneck or a cunningham control system. One W.S.C. member, with a Siren, would tie a trucker's hitch in the main halyard which gave him a 2 to 1 advantage in tensioning the main halyard but then he had the problem of removing the hitch when he was done sailing for the day in order to install the main sail cover.

The new HIGH-TECH ropes for halyards can definitely improve your windward sail shape as compared to dacron double braid which will stretch by approximately 4% quite readily. On a 30 ft. halyard, 4% stretch means that the top of the sail can slide down the mast by as much as 14 inches.
P.S. You can always tell who has low stretch halyards, after boats have been sailing in strong winds for a while, by the size of the creases in their sails. So if you notice your mainsail exhibiting lots of creases up the luff after sailing in strong winds,
#1 Turn into the wind.
#2 Slacken off gooseneck downhaul and vang.
#3 Tighten main halyard.
#4 Tighten gooseneck downhaul and vang and enjoy the benefits of a tight mainsail luff in strong winds.


HARDWARE
It was found that the original fitting for the boom vang anchor was excellent for the purpose it was designed for (to act as an anchor for the vang, pulling at 45degrees to the mast) but if the pull on it was straight up, it might not stand up to the stresses involved. It was elected to use the aft pivot hole in the mast step, with a 3/8" stainless pin, with sleeves to hold the special fitting on center, to perform as a suitable anchor for a 45degree pull as well as a pull straight up the mast.


The pin is held in place by a pivoting stainless plate that swings out of the way for pin removal or insertion.


The pin and sleeves must be removed any time the mast is installed or removed from the mast step.


The original boom vang hardware was used ( with the exception of the fitting that attaches the vang to the boom bracket-an improved replacement fitting -HOLT-ALLEN #HA4002- was found).


The gooseneck downhaul was made up of readily available RWO fittings. The original thumb screw lock was replaced with a stainless steel threaded stud (with a 3/16" hole in the outer end) and a sleeve threaded into the original lock threads.


Downhaul attached to gooseneck stud.


BOOM VANG
Having a boom vang that is properly designed for your boat is essential for running before the wind (broad reaching and running).
Without a proper vang that is well tensioned, you will find that the end of the boom will rise as the wind increases when you are running. The more sail area you can present to the wind, the faster your boat will go. A flat sail has more effective sail area than a curved sail on a run.
Another factor to consider is the dreaded "ACCIDENTAL GYBE". If the mainsail , when on a run, is allowed to swing wildly from one side to the other, (if the wind shifts direction) CATASTROPHIC RESULTS could occur.

You may find that
#1 The boat will swing wildly onto the new heading, if you are lucky.
#2 If you aren't lucky, the boat could BROACH and you may find yourself and your crew in the water.
#3 You may also find that if you are still sailing (for the moment) that you have broken some essential piece of sailboat hardware e.g. rudder blade, tiller, pintles/gudgeons or gooseneck.

A gybe under controlled conditions is a very useful sailing technique, an uncontrolled gybe can spell DISASTER.