

Objectives - Propeller Test #1
Since the propeller is so visible at dock [motor tilted up out of water], would epoxy paint stand up better than original HONDA paint which was peeling and chipping?
Details -Propeller Test #1
Original HONDA [5 hp] propeller sandblasted and painted [ 2 coats epoxy primer and 2 coats FOREST GREEN AWLGRIP paint].
Results
Shows no deterioration of paint after 2 full seasons of sailing, approximately 200 start ups of motor to motor in and out of dock.
WINDOW FRAMES
Interest has been expressed in the window frames on our MATILDA.
The earlier MATILDAS had rubber window frames which had a rubber gasket surrounding the window with a groove in the rubber to encircle the window and a groove in the out
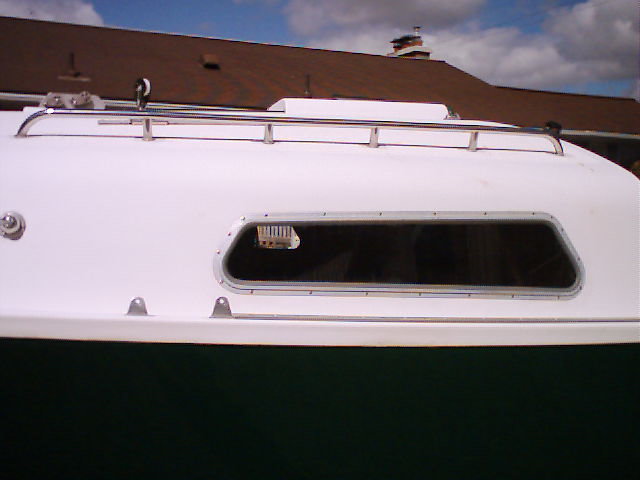 side of the rubber to hold the rubber frame in the cutout in the fibreglass wall . These windows were quite susceptible to leaks [ one only has to look closely at windows of this style to see the attempts to prevent leaks- copious quantities of silicone around the edges of the gasket] and were certainly not the most secure [ one member of our club was astonished when he leaned against the window with his knee and the window popped out of the gasket].
Later Matildas had an aluminum frame [which was riveted to the fibreglass wall] which have proven to be much superior in preventing leaks as well as vastly improving the strength of the windows. An earlier modification that was made to our MATILDA was the addition of an aluminum frame to the inside of our windows . The window frame gasket presented quite a challenge to locate a source for the proper gasket. We were fortunate to find HOLLAND MARINE in Toronto had a supply of gasket material in stock [PETER told me they had special dies made up to extrude the gasket material when they could not find any other source for this gasket which is also used on many other boats]. Installing the gasket presented no great challenge and they went together quite well and have stood up well for over 2 years now [NO LEAKS]. SPECIAL NOTE RE INSTALLING GASKET-since the gasket is pushed into the groove in the frame, be sure that the groove into which the gasket is being inserted, is uniform in width around the frame, especially the corners as that is where we found the groove to be closed up a little. A copious amount of dishwashing soap aids in inserting the gasket. The frames are held in place with flat head #8-32 stainless bolts , 3/4" in length with a stainless flat washer, lock washer and acorn nut on the inside.
WINDOWS
As the original windows were severely clouded, we elected to replace the windows with LEXAN. A local glass shop duplicated the windows in lexan.
Thank you so very much for this great detailed work of yours, it certainly has given me a head start on what to look for and what to do on my newly acquired Matilda that needs "a LOT of work", i need as much as info and where to buy as possible..thks again
ReplyDeleteHurrah! In the end I got a website from where I can genuinely
ReplyDeletetake valuable facts regarding my study and knowledge.
Also visit my site windows repair
you are truly a good webmaster. The web site loading pace is incredible.
ReplyDeleteIt seems that you are doing any distinctive trick.
Also, The contents are masterpiece. you have performed a
wonderful job on this matter!
my homepage - private jets for charter
I am genuinely grateful tto the owner of this web site who has shared
ReplyDeletethis wonderful article at at this time.
Look at my web blog; website ()